Let’s Encrypt is a free, automated, and open certificate authority (CA), run for the public’s benefit. Let’s Encrypt is a service provided by the Internet Security Research Group (ISRG).
The key principles behind Let’s Encrypt are:
◾ Free: Anyone who owns a domain name can use Let’s Encrypt to obtain a trusted certificate at zero cost.
◾ Automatic: Software running on a web server can interact with Let’s Encrypt to painlessly obtain a certificate, securely configure it for use, and automatically take care of renewal.
◾ Secure: Let’s Encrypt will serve as a platform for advancing TLS security best practices, both on the CA side and by helping site operators properly secure their servers.
◾ Transparent: All certificates issued or revoked will be publicly recorded and available for anyone to inspect.
◾ Open: The automatic issuance and renewal protocol will be published as an open standard that others can adopt.
◾ Cooperative: Much like the underlying Internet protocols themselves, Let’s Encrypt is a joint effort to benefit the community, beyond the control of any one organization.
To benefit fully from this guide I recommend that you learn by practice. Choose Your VPS Plan here at DigitalOcean, or HostGator has quality virtual private server (VPS) server packages. Sign Up for VPS HERE Now!
The New HostGator VPS Is Stronger Than Ever!
A HostGator VPS is completely customizable and can be upgraded any time as your site grows. Full root access allows you total control, as well as the ability to install advanced software and completely customize your hosting environment. It truly is dedicated functionality without the expense.
Download and install git to your system.
root@gs01:~# apt-get install git
Download, Clone and Install Let’s Encrypt
root@gs01:~#sudo git clone https://github.com/letsencrypt/letsencrypt /opt/letsencrypt
Change directory
root@gs01:~# cd /opt/letsencrypt
root@gs01:/opt/letsencrypt#
Create an SSL Certificate
Let’s Encrypt automatically performs Domain Validation (DV) using a series of challenges. The Certificate Authority (CA) uses challenges to verify the authenticity of your computer’s domain. Once your server is validated, the CA will issue SSL certificates to you.
Run Let’s Encrypt with the –standalone parameter. For each additional domain name requiring a certificate, add -d example.com to the end of the command.
To obtain a cert I used the Webroot plugin to request an SSL certificate with these commands.
root@gs01:/opt/letsencrypt#./letsencrypt-auto certonly -a webroot --webroot-path=/var/www/YourFolder/public_html -d magwinya.co.za -d www.magwinya.co.za
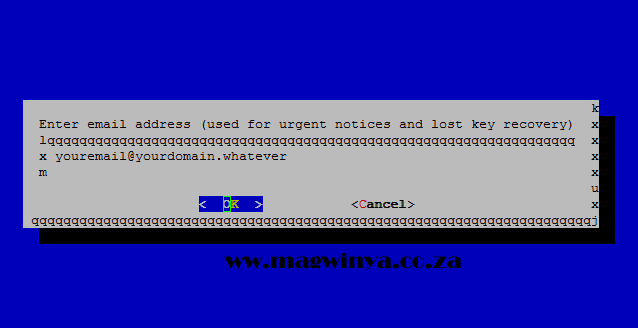
Specify an administrative email address. This will allow you to regain control of a lost certificate and receive urgent security notices if necessary. Press TAB followed by ENTER or RETURN to save.
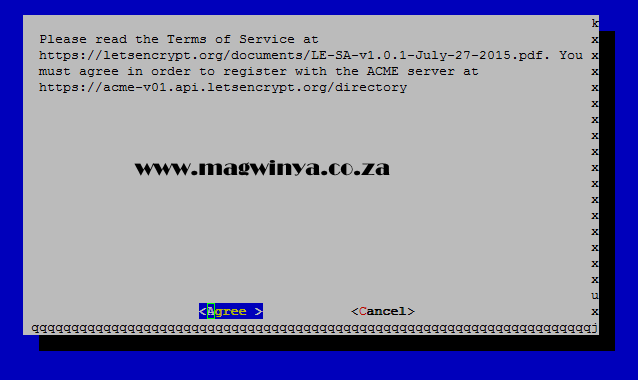
Agree to the Terms of Service.
IMPORTANT NOTES:
 - If you lose your account credentials, you can recover through
   e-mails sent to youremail@yourdoamin.whatever.
 - Congratulations! Your certificate and chain have been saved at
   /etc/letsencrypt/live/magwinya.co.za/fullchain.pem. Your cert will
   expire on 2016-06-18. To obtain a new version of the certificate in
   the future, simply run Let's Encrypt again.
 - Your account credentials have been saved in your Let's Encrypt
   configuration directory at /etc/letsencrypt. You should make a
   secure backup of this folder now. This configuration directory will
   also contain certificates and private keys obtained by Let's
   Encrypt so making regular backups of this folder is ideal.
 - If you like Let's Encrypt, please consider supporting our work by:

   Donating to ISRG / Let's Encrypt:   https://letsencrypt.org/donate
   Donating to EFF:                    https://eff.org/donate-le
Configure Your Nginx Server Block to look as follows:
root@gs01:~# cat /etc/nginx/sites-available/magwinya.co.za
# You may add here your
# server {
#       ...
# }
# statements for each of your virtual hosts to this file

##
# You should look at the following URL's in order to grasp a solid understanding
# of Nginx configuration files in order to fully unleash the power of Nginx.
# http://wiki.nginx.org/Pitfalls
# http://wiki.nginx.org/QuickStart
# http://wiki.nginx.org/Configuration
#
# Generally, you will want to move this file somewhere, and start with a clean
# file but keep this around for reference. Or just disable in sites-enabled.
#
# Please see /usr/share/doc/nginx-doc/examples/ for more detailed examples.
##

# Server Block Configuration for magwinya.co.za
server {
        listen 8080;
#       listen [::]:81 default_server ipv6only=on;

        root /var/www/YourFolder/public_html;
        index index.php index.html index.htm;

        location ^~ /.well-known/ {
        allow all;
        }

        ssl on;
        #listen [::]:443 ipv6only=on;
        listen 443;
        # Make site accessible from http://localhost/
        server_name magwinya.co.za www.magwinya.co.za;
        # rewrite     ^   https://my.magwinya.co.za$request_uri? permanent;

        ssl_certificate /etc/letsencrypt/live/magwinya.co.za/fullchain.pem;
        ssl_certificate_key /etc/letsencrypt/live/magwinya.co.za/privkey.pem;
        ssl_stapling on;
        ssl_stapling_verify on;
        ssl_protocols TLSv1 TLSv1.1 TLSv1.2;
        ssl_ciphers 'ECDHE-RSA-AES128-GCM-SHA256:ECDHE-ECDSA-AES128-GCM-SHA256:ECDHE-RSA-AES256-GCM-SHA384:ECDHE-ECDSA-AES256-GCM-SHA384:DHE-RSA-AES128-GCM-SHA256:DHE-DSS-AES128-GCM-SHA256:kEDH+AESGCM:ECDHE-RSA-AES128-SHA256:ECDHE-ECDSA-AES128-SHA256:ECDHE-RSA-AES128-SHA:ECDHE-ECDSA-AES128-SHA:ECDHE-RSA-AES256-SHA384:ECDHE-ECDSA-AES256-SHA384:ECDHE-RSA-AES256-SHA:ECDHE-ECDSA-AES256-SHA:DHE-RSA-AES128-SHA256:DHE-RSA-AES128-SHA:DHE-DSS-AES128-SHA256:DHE-RSA-AES256-SHA256:DHE-DSS-AES256-SHA:DHE-RSA-AES256-SHA:AES128-GCM-SHA256:AES256-GCM-SHA384:AES128-SHA256:AES256-SHA256:AES128-SHA:AES256-SHA:AES:CAMELLIA:DES-CBC3-SHA:!aNULL:!eNULL:!EXPORT:!DES:!RC4:!MD5:!PSK:!aECDH:!EDH-DSS-DES-CBC3-SHA:!EDH-RSA-DES-CBC3-SHA:!KRB5-DES-CBC3-SHA';
        ssl_dhparam /etc/ssl/certs/dhparam.pem;
        ssl_prefer_server_ciphers on;
        ssl_session_cache shared:SSL:10m;

        # force https-redirects
        if ($scheme = http) {
        return 301 https://www.magwinya.co.za$request_uri;
        }


        location / {
                # First attempt to serve request as file, then
                # as directory, then fall back to displaying a 404.
                try_files $uri $uri/ /index.php?q=$uri&$args;
                # Uncomment to enable naxsi on this location
                # include /etc/nginx/naxsi.rules
        }

        location /doc/ {
                alias /usr/share/doc/;
                autoindex on;
                allow 127.0.0.1;
                allow ::1;
                deny all;
        }

        # Only for nginx-naxsi used with nginx-naxsi-ui : process denied requests
        #location /RequestDenied {
        #       proxy_pass http://127.0.0.1:8080;
        #}

        error_page 404 /404.html;

        # redirect server error pages to the static page /50x.html
        #
        error_page 500 502 503 504 /50x.html;
        location = /50x.html {
                root /usr/share/nginx/html;
        }

        # pass the PHP scripts to FastCGI server listening on 127.0.0.1:9000
        #
        location ~ \.php$ {
        #       fastcgi_split_path_info ^(.+\.php)(/.+)$;
        #       # NOTE: You should have "cgi.fix_pathinfo = 0;" in php.ini
        #
        #       # With php5-cgi alone:
        #       fastcgi_pass 127.0.0.1:9000;
        #       # With php5-fpm:
                fastcgi_pass unix:/var/run/php5-fpm.sock;
                fastcgi_index index.php;
                fastcgi_param SCRIPT_FILENAME $document_root$fastcgi_script_name;
                include fastcgi_params;
        }

        # deny access to .htaccess files, if Apache's document root
        # concurs with nginx's one
        #
        location ~ /\.ht/ {
                deny all;
        }
}


# another virtual host using mix of IP-, name-, and port-based configuration
#
#server {
#       listen 8000;
#       listen somename:8080;
#       server_name somename alias another.alias;
#       root html;
#       index index.html index.htm;
#
#       location / {
#               try_files $uri $uri/ =404;
#       }
#}


# HTTPS server
#
#server {
#       listen 443;
#       server_name localhost;
#
#       root html;
#       index index.html index.htm;
#
#       ssl on;
#       ssl_certificate cert.pem;
#       ssl_certificate_key cert.key;
#
#       ssl_session_timeout 5m;
#
#       ssl_protocols SSLv3 TLSv1 TLSv1.1 TLSv1.2;
#       ssl_ciphers "HIGH:!aNULL:!MD5 or HIGH:!aNULL:!MD5:!3DES";
#       ssl_prefer_server_ciphers on;
#
#       location / {
#               try_files $uri $uri/ =404;
#       }
#}
root@gs01:~#
Manage the Nginx Process
Now that you have your certificate up and running, we can go over some basic management commands.
To stop and then start the service again, type:
root@gs01:~# service nginx restart
root@gs01:~# nginx -t
nginx: the configuration file /etc/nginx/nginx.conf syntax is ok
nginx: configuration file /etc/nginx/nginx.conf test is successful
root@gs01:~#
Now browse your site and i should be using HTTPS.
Renewing a or Multiple Certificates.
Once you have your certificate setup, you can add a simple shell cron entry to renew the certificate automatically for you:
Change Directory.
root@gs01:~# cd /usr/local/bin
Create a shell script and renew certificates
root@gs01:/usr/local/bin#vi letsencrypt-auto-renew.sh
And then copy and paste this shell script:
#!/bin/bash
#
# Created by Geneva Sibanda
# For All His eSG NETWORKS - Ubuntu Nginx Web Hosting Servers.
# https://www.esgnet.co.za
#
###########################################
#                                         #
# Execute the Let'sEncrypt-auto renew     #
#                                         #
###########################################
##    all actions and set full path too  ##
web_service='nginx'
cd /opt/letsencrypt
./letsencrypt-auto renew
sudo git pull
# We All Have To Do Something Meaningful In Life.
echo "Reloading $web_service"
/usr/sbin/service $web_service reload
exit 0
Create a new cron job that will execute the letsencrypt-auto renew.
root@gs01:/usr/local/bin#crontab -e

30 2 * * 1 bash /usr/local/bin/letsencrypt-auto-renew.sh
Save and exit: Now every Monday at 2:30 am, the command will run, check and update your SSL certificate.
Conclusion
That’s it! Your web server is now using a free Let’s Encrypt TLS/SSL certificate to securely serve HTTPS content.