Module information
| Bachelor degree | Semester module | NQF level: 7 | Credits: 12 |
| Module presented in English | Pre-requisite: none | Co-requisite: none | |
| Purpose: To enable students to demonstrate their understanding of managing all phases of a software development project, which includes project initiation and process analysis, resource planning and allocation, project design, risk management, monitoring and control of a project, managing people and teams, implementation and coordination of projects. | |||
Unique Number: 759379
Marks weight: 20%
ASSIGNMENT 02 – SEMESTER 2
| Due date | 05 September 2016 |
| Study material | Hughes & Cotterell: Chapters 2 |
| Total marks | 32 marks = 100% |
| If your assignment is late, please DO NOT PHONE OR E-MAIL asking for an extension but include a note in your assignment stating the reason for the late submission and we will decide whether or not it will be marked. This is a compulsory assignment | |
Instructions:
1. Complete this assignment and submit online in a .pdf format by performing the calculations.
2. The following unique number has to be assigned to the assignment:
3. Show all your working (calculations).
4. This assignment consists of 5 questions.
QUESTIONS FOR ASSIGNMENT 02:
The cash flows of Projects 1 and 2 are given in the table below (in ZAR, South African rand, R):
| Year | Project 1 | Project 2 |
| 0 | -R155000 | -R140000 |
| 1 | -R5000 | R15000 |
| 2 | R40000 | R5000 |
| 3 | R50000 | R20000 |
| 4 | R50000 | R30000 |
| 5 | R50000 | R60000 |
| 6 | R30000 | R70000 |
Table of cash flows for Project 1 and 2
Use this information to calculate the Net Profit, the Return on Investment (ROI), the payback period and the Net Present Value at 10% for each of these projects. Then answer Questions 1 – 5.
Solutions: coming soon:
1. Calculate the Net Profit for each project. (6 marks)
2. Calculate the Return on Investment for each project. (6 marks)
3. Calculate the Payback Period for each project. (6 marks)
4. Calculate the Net Present Value for each project. (12 marks)
5. Based on your calculation of the individual Return on Investment (ROI) of each project in question 2 above, which project would you select to develop? (2 marks)
6 Ways To Maximise Your Online Brand Presence
1. Build up your website
Did you know that 81% of consumers go online before heading out to a store? Make sure your potential customers have no trouble finding out information about your business. Hire an expert website developer to build your web presence today.
2. Start a blog
Looking to establish your business as an industry thought leader, and boost customer engagement? Starting a blog, and writing quality content is a great way to build your audience and visibility online. Get started today by hiring an expert content writer.
3. Invest in a social media strategy
A strong and consistent social media strategy can make all the difference when it comes to online engagement. On average, businesses spend about 6 hours per week on social media marketing. Don’t have the time or expertise? Engage us to assist with your social media strategist to skyrocket your business’s online visibility today.
4. Leverage video marketing
Did you know that videos are shared 1,200% more times than links and text combined? But, creating quality videos for different channels can be a tricky task. Hire an expert videographer to create shareable videos that will help boost your visibility.
5. Optimize your content for search engines
Let me guess, you’ve written great content, but not getting the traffic you want. Are you looking for a way to make your content more visible? Hire a SEO expert to help improve your website’s search engine ranking, so you’re always on your customers radar.
6. Build a responsive website for mobile
Mobile browsing is getting more and more popular each day. Make sure your website is accessible and optimized for mobile devices by hiring a website developer today.
With eSG NETWORKS you can turn any idea into reality by sharing a clear business idea and few meetings.
530 Login incorrect via ProftpD
How to fix “Error: Critical error: Could not connect to server” on ubuntu 14.04
Status: Resolving address of ftp.esgnet.lan
Status: Connecting to 10.11.1.21:21…
Status: Connection established, waiting for welcome message…
Status: Initializing TLS…
Status: Verifying certificate…
Status: TLS connection established.
Command: USER sibanda
Response: 331 Password required for esgnet
Command: PASS ***********
Response: 530 Login incorrect.
Error: Critical error: Could not connect to server
Solution:
Go edit /etc/shells
vi /etc/shells
# /etc/shells: valid login shells
/bin/sh
/bin/dash
/bin/bash
/bin/rbash
/usr/bin/tmux
/usr/bin/screen
“/bin/false”
/bin/false
How to Install and Configure ProFTPD on Ubuntu 14.04 Server
ProFTPD (short for Pro FTP daemon) is an FTP server. ProFTPD is Free and open-source software, compatible with Unix-like systems and Microsoft Windows (via Cygwin). Along with vsftpd and Pure-FTPd, ProFTPD is among the most popular FTP servers in Unix-like environments today.
This article assumes you have at least basic knowledge of linux, know how to use the shell, and most importantly, you host your site on your own VPS. The installation is quite simple. I will show you through the step by step installation ProFTPD in ubuntu 14.04 server.
Install ProFTPD on Ubuntu 14.04
Step 1. First make sure that all your system packages are up-to-date by running these following apt-get commands in the terminal.
root@gs01:~# sudo apt-get update -y && sudo apt-get upgrade -y
Step 2. Install ProFTPD and all required packages.
root@gs01:~# sudo apt-get install proftpd
During the installation, you’ll be prompted to choose the installation method that you prefer. There are two installation methods, inetd and the standalone. For this installation I selected “Standalone” method, and then OK to finish the installation.
Step 3. Configure ProFTPD
Let’s edit the configuration file for ProFTPD:
root@gs01:~# vi /etc/proftpd/proftpd.conf
Change the ServerName to the hostname of your server. In the case below, is an example:
ServerName “your.servername.whatever”
To limit users to their home directory uncomment the line that says DefaultRoot:
# Use this to jail all users in their homes
DefaultRoot ~
Exit and save the file with the command :wq .
Create FTP User
Step 4. Add an FTP User.
Before you create a user for Proftpd, please add /bin/false to your /etc/shells file:
root@gs01:~# echo “/bin/false” >> /etc/shells
Create a user with a home directory where he will get access to by FTP. I will disable shell access for this user by assigning the “/bin/false” shell to him to ensure that he can not login by SSH. My username is named “ftp-user”, please replace ftp-user with your username in the next command:
root@gs01:~# adduser --home /home/ftp-user --shell /bin/false ftp-user
Step 5. Granting write permissions.
NB: Make sure that you grant write permissions to ftp-user User and ftp-user group, and remember to replace ftp-user with your username in the next command:
root@gs01:~#chown -R ftp-user:ftp-user /home/ftp-user
And if you don’t grant write permissions to your ftp-user you will definitely encounter the following errors:
After installing proftpd on my ubuntu 14.04 server. I encountered the following technical issues.
tatus: Connection established, waiting for welcome message...
Status: Insecure server, it does not support FTP over TLS.
Status: Connected
Status: Retrieving directory listing...This is happening when using ftp client FileZilla.

Some of the errors I encountered:

Status: Connection attempt failed with "ECONNREFUSED - Connection refused by server".
Error: Could not connect to server
Then set the ProFTPD service to start at boot:
root@gs01:~#update-rc.d proftpd defaults
Step 6. Implementing Iptables Rule.
Iptables is used to set up, maintain, and inspect the tables of IP packet filter rules in the Linux kernel.
root@gs01:~#iptables -A INPUT -p tcp -m tcp --dport 21 -m conntrack --ctstate NEW,ESTABLISHED -j ACCEPT
root@gs01:~#iptables -A INPUT -p udp -m udp --dport 21 -m conntrack --ctstate NEW,ESTABLISHED -j ACCEPT
root@gs01:~#iptables -A INPUT -p tcp -m tcp --dport 49152:65534 -m conntrack --ctstate NEW,ESTABLISHED -j ACCEPT
root@gs01:~#iptables -A INPUT -p udp -m udp --dport 49152:65534 -m conntrack --ctstate NEW,ESTABLISHED -j ACCEPT
root@gs01:~#iptables -A OUTPUT -p tcp -m tcp --dport 21 -m conntrack --ctstate NEW,ESTABLISHED -j ACCEPT
root@gs01:~#iptables -A OUTPUT -p udp -m udp --dport 21 -m conntrack --ctstate NEW,ESTABLISHED -j ACCEPT
root@gs01:~#iptables -A OUTPUT -p tcp -m tcp --dport 49152:65534 -m conntrack --ctstate NEW,ESTABLISHED -j ACCEPT
root@gs01:~#iptables -A OUTPUT -p udp -m udp --dport 49152:65534 -m conntrack --ctstate NEW,ESTABLISHED -j ACCEPT
root@gs01:~#iptables -A INPUT -j DROP
Save Firewall Rules
To save firewall rules under ubuntu 14.04 server, enter:
root@gs01:~#service iptables-persistent save
Restart the ProFTPD service:
root@gs01:~#service proftpd stop && service proftpd start
Step 7. Access the FTP server.
Once you have installed the FTP server successfully, Now all you have to do is open an FTP client like FileZilla and connect to the server using its IP address, hostname or domain name. If everything is configure correctly, you should be granted access to the server with the correct username and password.
$10 Credits For VPS Hosting When You Sign Up for DigitalOcean today!
Did you know that you can earn a $25 account credit for each friend you refer to DigitalOcean?
Give $10, Get $25
Everyone you refer gets $10 in credit. Once they’ve spent $25 with DigitalOcean, you’ll get $25. There is no limit to the amount of credit you can earn through referrals.
Check below My Referral Stats
Clicks |
Number of times your link has been clicked. | 1803 |
Referrals |
People who have signed up using your link. | 19 |
Pending |
Amount I stand to earn when my referrals have spent $25. | $450.00 |
Earned |
Amount that will be applied to my account balance. | $0.00 |
Paid |
Amount that has already been applied to your account. | $25.00 |
Here is the beauty about my DigitalOcean referral, once my pending amount is applied to my account balance, it means that I will be hosting this site for free. I won’t be paying a cent for as long as my referrals continue stream in. Isn’t that GREAT?
Don’t miss out! Just visit my referral program page to spread the word: Click HERE to Join DO subscription to Get started
Simple to Set Up. Flexible to Scale. VPS Installation and Setup!
In addition to the awesome special offer, if you order your VPS hosting through this blog, you can have your VPS installed and set up for a small once off fee of $50.00! All installs will include the following:
◾Ubuntu Server Setup
◾NGINX Setup and Config
◾MySQL Database Setup and Config
◾IPtables Firewall Setup and Config (to protect your VPS)
◾You advise if you need any cPanel – (I will setup VestaCP for you).
◾WordPress Setup and Config
◾Let’sEncrypt SSL Certificate Setup and Config – (to meet SSL Certificate On Your Website.)
◾Manage VPS for a small fee, starting from $15.00/month – (keeping things running smoothly)
All you have to do is Click HERE to order a VPS hosting plan from DigitalOcean, then forward me the DigitalOcean login information to sibanda.geneva [at] yahoo.com, and I’ll install VPS and WordPress for you. Afterwards, I’ll email you back the login information for your new WordPress Blog and you can start blogging!
Thank you in advanced, I appreciate your business!
Trusted Web Hosting You Can Use!
Practical Guide to a TRUSTED List of Web Hosting Providers.
If you’re in the process to buying web hosting or running a web site, this guide could answer some of those nagging questions. I’ll take you from the very beginning and work up to some fairly advanced concepts – but don’t worry, everything on this guide is suitable for absolute beginners.
What is web hosting and domain?
In a sense, you rent space on a computer to hold your website. Your host, the computer where your website files are stored, assigns an address (DNS) for your files to your domain name so that anyone can find your website on the Internet by typing in your domain name.
How to get the best Web Hosting Package for your website?
Web hosting is all about keeping your web site online, secure, and available super-fast when your visitors arrive to your site. Your Hosting server, should be ultra-fast and ultra-secure, have the capacity and storage you need to keep your site online. All with 24/7 support and backup from professional tech support staff.
Searching for the best web hosting is not a job to be taken lightly and to make it easier for you, I have compiled some of the best hostings for your blog below.
Check out our TRUSTED community.
We promote the spread of good HOSTING PROVIDERS used by millions of other people:
Small Business WEEK Savings! HostGator Up to 60% Off!
| Small Business Week: 60% Off New Shared Business Hosting Plans + More! |
| We are celebrating Small Business Week with a very unique offer from HostGator for those looking to get their businesses online! From April 30th 12am to May 7th 11:59pm CST we will be offering60% OFF Shared Business hosting plans & 50% on all other Shared Hosting plans of 12-36 months. |
That’s not all! We are also offering 50% OFF 1 year of Basic Code Guard!
| Provider | Activities | Great Started | Action |
| HostGator | 100K+ websites are created every day! Take advantage of that demand. | Start Building Your Website Today! | Click HERE to start! |
Take your WordPress to the next level today!
| Provider | Activities | Great Started | Action |
| Arvixe | Linux Web Hosting | Shared Hosting | Dedicated Servers | Start Building Your Website Today! | Click HERE to start! |
Complete hosting solutions for any type website.
| Provider | Activities | Great Started | Action |
| Bluehost | When building a website, start here. Powerful platform that’s perfect for hosting your websites. | Start Building Your Website Today! | Click HERE to start! |
Improve Your Website Speed.
MaxCDN One has everything you need to deliver content fast – all in one place. Click HERE to Sign UP.
These offers are only valid on new hosting packages, not applicable on renewals or existing hosting plans.
Top Speed Is a must for a Busy WordPress Site with Bursts of Traffic.
Slow Speed Kills Your WordPress Site.
Take this advise very serious, you will definitely enjoy the positive outcome. (Seriously, true story!).
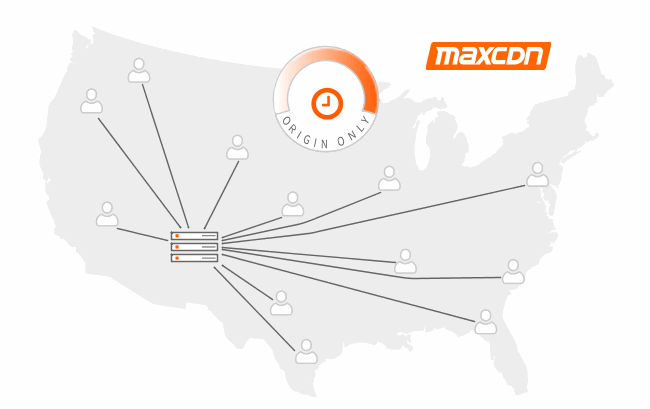
Congratulations! For stopping by now here is a chance to impress your site visitors by integrating your WordPress Website with MAXCDN. MAXCDN helps website owners and web developers make their sites faster and more reliable than ever before.
Maxcdn.com is the leader in CDN services and this market is fresh and young and exploding with growth.
Click HERE to Join MaxCDN subscription to get started
MaxCDN has the support, network, and features to help individuals and growing businesses deliver big ideas to big audiences. To achieve faster page load times, better Google rankings, and more conversions with our CDN. Setup is simple and only takes minutes.
Maxcdn.com, gives users access to one of the most powerful content distribution networks around. The further people are from a website’s stationary server the longer it takes for them to load any pages, but this service eliminates that frustrating wait that costs precious hits.
Boost your WordPress SPEED with MaxCND’s Top Global reach redundancy.
You do not want to miss out on this opportunity again. Every website owner is starting to realise the need to enhance there website for the best speed and load times they can. Competition is getting fierce and this is the next leg up over your competitors. It is very cost effective for any business or individual WordPress site.
In addition, MaxCDN offers global enterprise grade CND at competitive pricing without cutting corners. MaxCDN use only the best quality equipment powered by reliable global caching kit with built in redundancy features, and advanced reliability to run your WordPress Site at a Top speed.
MaxCND offers multisite and Use DNS geo-routing to take advantage of nearest server based on the location.
In addition, they periodically provide you with engaging news and information on CDN technology, new product features, and unique customer experiences.
MaxCDN Packages For all packages, unused bandwidth rolls over to the next month.
Click HERE to Join MaxCDN subscription to get started, and team MaxCND will love to welcome you!
Start Your WordPress Blog With HostGator Today!

My Trusted WordPress hosting Provider, HostGator is offering affordable WordPress hosting deals on all their hosting packages. If you haven’t started your blog yet, today would be a great day to great started!
The Best Features At The Best Price!
HostGator gives you a vast array of tools to take your idea or business online today! From site building tools and templates, to our one-click application installer, everything you need to launch a website is literally at your fingertips. With this deal, you can start a new blog for as low as $3.95 a month! What makes this deal even better? Is that; I will install and set up your new WordPress blog for you for free?!
Free WordPress Installation and Setup!
In addition to the awesome special offer of the day, if you order your hosting through this blog, you can have WordPress installed and set up for free! All installs will include the following plugins to get your blog started on the right track:
◾Advanced Automatic Updates
◾Yoast SEO
◾Google Sitemap
◾W3 Total Cache
◾Show Top Commentators
◾WordPress.com Stats
◾Anti-spam
All you have to do is order a web hosting plan from HostGator, then forward me the HostGator cPanel login information to sibanda.geneva [at] yahoo.com, and I’ll install WordPress for you. Afterwards, I’ll email you back the login information for your new WordPress blog and you can start blogging!
Click Here To Order Your New WordPress Blog
I will also include instructions on how to change all your login passwords. I will not keep any of the forwarded information from HostGator. Once WordPress has been set up, I will destroy the email.
Expect MORE With HostGator WordPress Hosting
Not only will you get your blog hosting at a huge discount, but every hosting plan at HostGator comes with $100 of Google AdWords credit that you can use to promote your new blog. Start your blog for 43% off, get WordPress and plugins setup for free, and get $100 of AdWords credit. You won’t find a better deal anywhere!
This is really an unbelievable deal for everybody who needs to get going! If you were thinking about starting your blog, RIGHT NOW is the time to do it! Order your web hosting plan and let me set up a new WordPress blog for you.
Click Here To Order Your New WordPress Blog
Spread the word and forward this promotion to your friends!
WordPress Hosting Affiliate Program
What is WordPress?
WordPress is a free and open-source content management system (CMS) based on PHP and MySQL. WordPress is installed on a web server, which either is part of an Internet hosting service or is a network host itself. Features include a plugin architecture and a template system.
WordPress powers more than 24% of the web — a figure that rises every day. Everything from simple websites, to blogs, to complex portals and enterprise websites, and even applications, are built with WordPress,
WordPress is the most popular blogging system, powerful CMS (Content Management System) technology used by fortune 500 companies like CNN, Forbes, VW, Jay-Z, The New Your Times and Katy Perry…etc.
WordPress is the dominating the blogging space and is increasingly used by some of the Top Earning Blogs as their preferred blogging platform.
How Top Earning Blogs Making Money From their WordPress Blog?
Today I decided to do my own research (doing research of your own should be your duty) to unpack how these super successful Blogs are making money ONLINE and where is their BIG source of income come from. There is an influx of methods these top blogger’s are using to monetize their blog, different techniques for each niche. Some niche’s are easier to promote products to, some have high paying keywords and some are easy to drive millions of visitors every month!
Personally I was surprised to learn that some of them make a lot of money promoting affiliate programs, this is not rocket science you and I can easily up our game and do exactly the same. Most affiliate programs are from reputable companies that provide quality WordPress Hosting Affiliate Program like TMDHosting WordPress Hosting,
To be a truly successful Affiliate Rock-star or print money in today’s online market space, you have to put in a ton of time to find the best techniques and do your due diligence to increase your odds of stardom on every niche.
Learn From the Best and Put their Practical and TESTED Strategies Into Practice:
To do that, I believe it’s essential that you learn from the experience of others. This helps you avoid mistakes and give you an upper-hand in emulating the practical and tested strategies of successful Top Earning Bloggers to achieve long-lasting success. You need to mapping your approaches into their strategies and amplify them into your mega success.
WordPress Hosting Affiliate Program is the best way to Make Money Online.
EARN MONEY AS A TMDHOSTING AFFILIATE – Make $50 commission for all products!
Unleash the power within – Online Money Making Secret Strategy
How does it work?
Ok! It works like this.
When someone subscribes to any of the TMDHosting WordPress Hosting Affiliate Program using your affiliate link you earn a commission. TMDHosting offer the highest commission percentage of any WordPress Hosting company on the net. All affiliates receive $50 of each sale, which is nearly double the industry standard. You also get paid for any annual subscriptions.
Your affiliates must subscribe within 60 days from the initial visit of the affiliate link. They abide by basic affiliate rules, so the first affiliate to tag the visitor keeps them for 60 days.
You can view your earning on TMDHosting Affiliate Program real time dashboard for affiliates.
Payments
Since PayPal is one of the most popular payment gateways, giving potential blogger the ability to receive paying using it is a surefire way to improve your odds of getting more sales. Payments are made monthly by direct paypal wire deposit once you reach the $100 minimum.
If you would like to run these types of affiliate on your blog, consider the following options:
- Visitor clicks on an affiliate link on your site or in an email.
- The visitors IP is logged and a cookie is placed in their browser for tracking purposes.
- The visitor browses our site, and may decide to order.
- If the visitor orders (the order need not be placed during the same browser session–cookies and IPs are stored indefinitely), the order will be registered as a sale for you.
- We will review and approve the sale.
- You will receive commission payouts on the 15th of every month (if your balance is at least $100) via PayPal.
- TMDHosting offer a 60 Day Money Back Guarantee, so joining is risk-free!
- There is absolutely no cost for you to be a TMDHosting affiliate. The earnings potential is substantial.
TMDHosting are reliable and solid hosting provider. I recommend them to anyone who want a super-fast website and SSD powered.

Yeap! That’s it!
Like any HUMAN BEING on this planet earth, Never EVER doubt your potential! Always remember this; you do have what it takes to replicate what others are already doing to make money online $100 and more RIGHT NOW. Just keep on pressing ahead, never GIVE UP!
I would love to know about any new products and other affiliate programs related to WordPress that have been working well for you. Use the comments section below to share your thoughts.
Good luck! and as Richard Quest, presenter of Quest Means Business says: Whatever you’re up to next week, make sure it’s profitable.
Remember to share this article on Facebook, Twitter and Google Plus.
Best Managed WordPress Hosting Servers
WpOven offers a affiliate program: Best Managed WordPress Hosting Servers – Get Yours Now!
 |
|
| Hosting Servers: | Affiliate Program Details |
| Website: | Sites Homepage: WPOven.com |
| Description: | All WPOven hosting plans come with the same features and differ only on resources allocated for the plan. All plans include Free Migration Service.
Affiliates earn 100% of first month’s payment or a minimum of $50 per sale (whichever is more). Highlights : ◾Get Paid when a referred user signs up to our hosting plan. |
| Earnings: | 100% of first month payment or $50 |
| Tiers: | 1 |
| Method of Payment: | Paypal |
| Pay Date: | Monthly |
| Minimum Payout: | $100 |
| Cookie Length: | 3 years |
| Tracking Software: | Cookies |
| Packages: | A decent plan starters From $19.95 USD |
| Features : | Dedicated VPS, Dedicated Resources, WordPress, WordPress Hosting, Managed Hosting, Site Builder, WordPress themes, Daily Offsite Backups and one click restore, Daily Malware scanning, Security best practices with firewall and DoS protection, Best Client Panel, etc |
| ◾Click Here to Signup for Your – WordPress Hosting Server | |